Home of the Day Sailer Association
Home of the Day Sailer Association
Day Sailer II Manual
Thanks to Roger Conrad for scanning and transcribing the text.
See also the related image (145kB).
Day Sailer
Operating and Rigging Instructions
CAUTION DO NOT BEGIN OPERATING OR RIGGING YOUR BOAT UNTIL YOU HAVE
READ ALL OF THE FOLLOWING OPERATING AND RIGGING INSTRUCTIONS
THOROUGHLY.
Safety Information
The mast, the stays, and all other parts of O'Day sailboats under 26 feet, following the general boating
industry practice, are not grounded. Should your O'Day sailboat be struck by lightning or make
contact with electrical power lines, substantial injury may result to the occupants. We recommend that
if you wish to be protected from an injury resulting from lightning, that you have your O'Day sailboat
grounded by an authorized O'Day dealer or other reputable boat yard in the manner recommended
by the American Boat and Yacht Council of New York, New York. Under all circumstances, whether
or not your boat is grounded, when lightning is present in your boating area, contact with the mast,
the stays, and other metallic objects should be avoided.
We do not believe that grounding would be effective to avoid injury to occupants of your sailboat,
if contact is made with electrical power lines.
When operating your sailboat on waterways, charts should be regularly consulted, not only for normal
hazards, but also for the presence of electrical power lines. In addition, a lookout should be
maintained for the presence of overhead electrical power lines, particularly during launching and
hauling.
The following is a list of standard equipment which comes with your boat.
1. A mast with two spreaders.
2. A boom with boom vang plate only.
3. Flat package containing rudder, tiller and boom crutch.
4. Sailbag containing mainsail and jib. The battens for the mainsail will be found in the sailbag.
5. Box of rigging containing main halyard jib halyard headstay sidestays outhaul line, downhaul line,
mainsheet spliced to single block with becket for mainsheet, jib sheet, boom vang assembly
only less plate.
Suggested Equipment for Rigging Boat
You will need a medium sized screwdriver a pair of pliers, a small roll of tape to cover cottar pins.
Optional Equipment
See your dealer on what is available - comes complete with installation instructions where applicable.
Mast
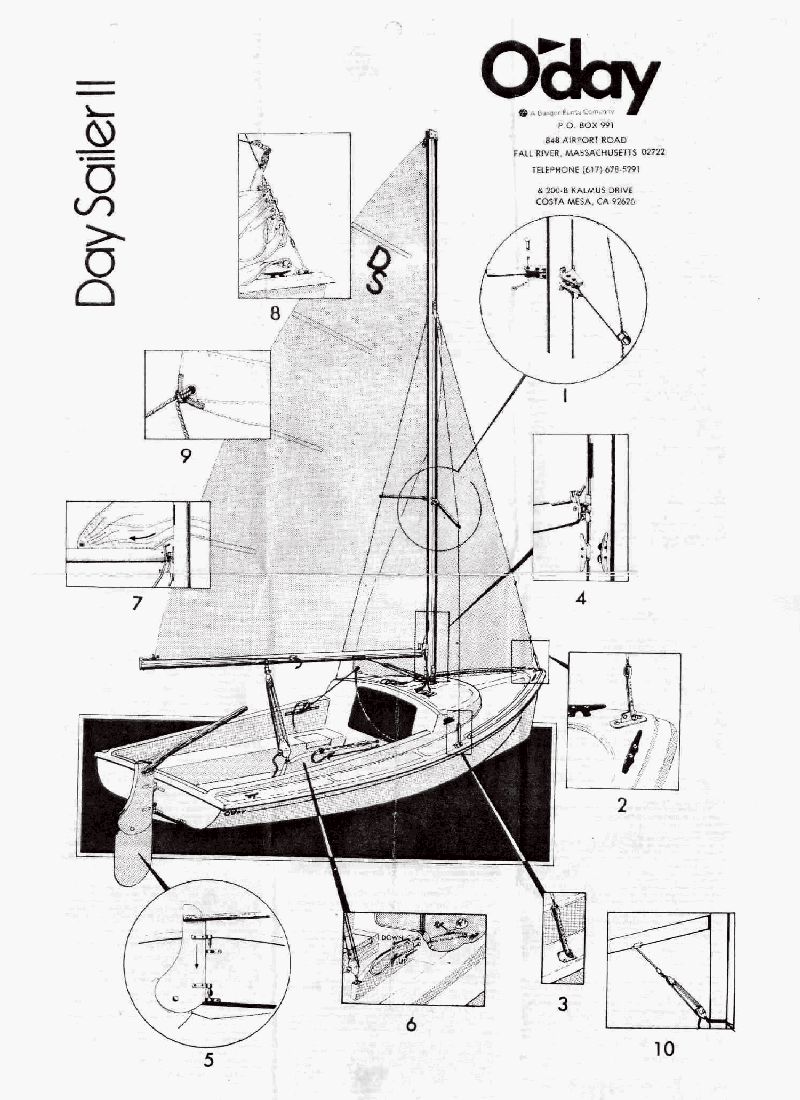
The first step is to remove the two spreaders which are taped on to the mast. You will notice that
these two aluminum tubes or spreaders have a hole in one end and a slot in the other end. These
spreaders should be fastened with clevis pins on to the fittings on either side of the mast about one
third up. Open ends of cotter pins after they are in place and tape.
Into each of the slots place a sidestay. A small wire will be found in a hole at the slotted end of the
spreader. Wrap the wire around the stay as many times as possible which prevents the stay from
lumping out of the slot. This area should then be covered with tape to protect the mainsail. See fig.
1.
Before you step the mast tie a figure 8 knot in the end of each halyard to prevent them from getting
out of reach, then pull the shackles on the other end of the halyards to the foot of the mast. This puts
the shackles in reach when the mast is stepped.
Stepping the mast
We recommend that you get assistance in stepping the mast until you are familiar with the stepping
procedure. A "tabernacle" is a great help as it permits easy one person stepping. This is a slotted mast
and the slot side faces the stern when in position to be stepped.
The mast is stepped through an opening in the deckbe sure the base of the mast is properly seated
on mast step. Once accomplished the mast will stay in place.
Now fasten the sidestays to the chainplates on either side of the hull. Next fasten headstay to
stemhead fitting. Turnbuckles which permit adjustment are provided on the lower ends of all stays
See figs. 2 & 3.
After all stays are attached, take the slack out of the rigging by tightening all stays taut, but no more
than hand tight. If you find a stay too long or too short, check for proper length or possibly the mast
step may have been positioned incorrectly. In the latter case, remove mast and then mast step. Next,
step mast onto unattached mast step (be sure to hold mast at all times) and attach stays. When
properly set up mark new position of mast stepfinally, unstep mast and screw step in place.
CAUTION: It is very important that you do not tighten the stays too much as this can cause damage
to the hull.
CAUTION: Be sure all lock nuts are securely tightened by pliers or a wrench and then taped to
prevent loosening.
Attaching Boom To Mast
Slip the gooseneck which is on the forward end of the boom into the slot on the mast and rest the
other end in the boom crutch. See fig. 4.
Mainsheet
Attach the block to bail on the boom.
Take the free end of the mainsheet, thread it through the upper sheave on the block on the aft end of
the centerboard trunk, bring it up through the block on the boom then back down to the bottom
sheave and thru the cam cleat. This type of mainsheet arrangement (as of January, 1974) frees up the
cockpit considerably in that the lower end is attached to a stainless steel plate on the aft end of the
centerboard trunk instead of the blocks on the port and starboard side of the stern of the boat. Tie
a figure eight knot in the end of the mainsheet so you won't lose it.
To Attach Rudder
On the stern of the boat are two gudgeons into which are inserted the pintles on the rudder. The
rudder blade will pivot back, should you hit an underwater object but the blade should be in the down
position while sailing. If the blade works up while sailing, weather helm will increase thereby
increasing drag and steering will become less efficient. Tighten the blade pivot bolt or wedge blade
in down position. See fig. 5.
Centerboard
The fiberglass centerboard is held in the centerboard trunk with a stainless steel bolt on which it
pivots. On the top of the centerboard there are two adjustment pendantsone running forward which
exits at the forward end of the trunk and is used to raise the centerboard, and the second which exits
on top of the forward end of the trunk and is used to lower the centerboard. *Watch these pendants
for wear and replace when necessary by removing the centerboard bolt and lowering the centerboard
out of the trunk. Cleat pendants to maintain proper centerboard position, except do not cleat aft
pendant when sailing in shallow water. See fig. 6.
*(As of August, 1975 a 10 1/2" piece of shock cord has been added to keep the forward c/b pendant
tight while the c/b is down)
Should the centerboard bolt leak it can be tightenedif leaking still persists reseal with a substance
like silicone sealant.
To Hoist or Raise Mainsail
To raise the mainsail, insert battens and then starting near the gooseneck, feed the foot of the sail,
clew first into the slot on the boom. The pin in the gooseneck slips through the tack of the sail to hold
it in place. Draw the foot of the sail out along the boom until the foot is tight. The outhaul line should
be attached to the clew of the sail, then passed through hole in fitting on end of boom, then cleated
on boom cleat which is located approximately two thirds of the way up on the right side of the boom.
The cleat is located here to permit the crew to change the tension on the foot of the sail while sailing
A "block action outhaul" is a help here as it greatly reduces the friction on the outhaul line. Next,
fasten the main halyard to the head of the mainsail and feed the luff of the sail into the mast slot
cutout. Hoist the sail fully and cleat it. Tighten the luff of the sail by pulling down on the line attached
to the gooseneck and then cleat it to the downhaul cleat. The position of this cleat on the mast may
be changed by loosening the two screws, moving cleat, and then tightening screws again. See fig. 7.
To Hoist Jib
Fasten all the jib snaps on the luff of the jib to the headstay and attach fitting on the tack to the
stemhead fitting. The jib halyard is then attached to the head of the jib just as the mainsail was. Tie
the center of the jib sheet to the clew of the jib and run them aft on either side of the mast inside the
stay wires, through the cam action cam cleats mounted on either side of the cockpit. Tie a figure 8
knot in the end of each sheet in order to prevent it from getting loose. See Figs. 8 & 9.
The jib sheet cam action cam cleat on track is adjustable fore and aftposition it so that the tension
on the foot and leech of the sail is about equal. Move lead forward to help stop leech flutter and aft
to help stop foot flutter.
Outboard Motor
The transom is reinforced so an engine can be clamped directly to it on either side of rudder. We
recommend a pad or transom plates which will prevent engine loss and scarring of fiberglass.
Recommended horsepower, 8 maximum long shaft.
Roller Reefing
A "Roller Reefing Claw" is necessary.
Your mainsail can be easily reefed, as the boat is equipped with a spring loaded gooseneck. First
remove the block in the middle of the boom. Second, release the main halyard but keep it under
tension. Third, pull the boom back from the mast so that you can turn it. Fourth, roll the boom either
way as you or your crew lets off slowly on the halyard. The sail will roll on the boom. Fifth, when
you have rolled about 5 or 6 times, you will have reduced your sail area by one third. Experience will
teach you how much to reef under various conditions. Sixth lock your boom back into place by letting
the boom go forward and tighten up halyard When reefed, the boom block for the mainsheet is
attached to the roller reefing claw. To shake out, just reverse procedure.
Flotation
There is sufficient flotation material (in block form) located between the hull and deck to support the
crew and normal gear, should the hull and deck compartment take on water through a leak or hull
puncture. Be sure to check these areas prior to sailing and pump out any water.
The Day Sailer cockpit is totally sealed and as long as it remains intact, no leaking should occur
except possibly through inspection bailing hand hole covers in the cockpit floor or centerboard bolt.
These can be easily resealed.
A drain is provided in transom to drain any accumulated water from the lower bilge (under cockpit
floor). This should only be opened while boat is beached or on trailer.
Self-bailer
Your boat is equipped with an automatic bailer located in the transom well. This enables spray or
rainwater to be siphoned out while underway or at mooring with boat at rest. A check ball and rubber
seal prevent water from entering while plunger is up in the open position. To open turn knurled knob
counter clockwise. To close, reverse process CAUTION The DePersia bailer is of aluminum and
the threads should be kept well lubricated to prevent corrosion. In salt water this should be done
twice a season.
Capsizing Procedure
Should the boat capsize while sailing, there are a number of steps that should betaken to insure the
safety of the boat and crew.
1. Make sure that each occupant has a life jacket on.
2. To prevent the boat from turning turtle (upside down), which can occur, put some weight on the
centerboard which will help to right the boat.
3. Take down the sails, if sailing under severe conditions.
4. Bail out any water in cockpit.
5. Remember your boat is equipped with flotation material and it can act as a life preserver.
Boating Safety Act
A new Federal Boating Safety Act was passed in 1971 to further encourage safety in boating O'Day
endorses the general nature of this Act and certifies that it reasonably complies with requirements of
the Act. There are several specific aspects of the Act new customers should understand.
1. Every O'Day boat has a special numbering system. Numbers are permanently molded into the
transom on all models. The first three letters are our manufacturing serial number, the next letter
represents the boat model code letter the first four numbers are the sail or class number and the last
four digits represent the model year and the month the boat was built.
2. Customers are required to provide approved life saving devices for each crew member on board.
3. Availability of approved fire extinguishers is required on many boats. Customers should consider
having an extinguisher even when not required.
4. Recommended horsepower for engine is included in O'Day's catalog and should be complied with
for safety and warranty reasons.
5. After dark boats must be lit in an approved fashion customers must make provision for this
6. O'Day is obligated to inform customers of manufacturing defects which may exist in specific boats.
O'Day must describe the defect, evaluate the hazards involved, and state the action it is taking to
eliminate the defect. Obviously O'Day cannot do this readily without record of each boat's owner,
which is supplied by return of the Warranty Card. The Company strongly urges this Card be returned
promptly.
General Information
The following information is to be used as a general guide and if you are unclear or need more help,
do not hesitate to call upon us or our dealer.
TuningDo not over tighten stays as mainsheet tension will dictate tension on headstay While
sailing, the leeward stays will always go slack due to mast bend, stretching, etc , so under no
circumstances should you tighten them under sail all adjustments should be made while at rest with
the sails down.
Maintenance
Fiberglass Repairsalthough fiberglass is a relatively simple material to work with, we urge that
you familiarize yourself with the proper procedures in order to insure good results.
The surface color (gel coat) should be cleaned and waxed at least twice a year in order to maintain
its luster. The color may fade due to weathering and if ordinary cleaning will not bring the color back
try a regular automotive compound followed up by waxing.
SailsDry and fold carefully after each use and if used on salt water, wash with fresh water every
so often. Fold by stretching out the sail on the lawn or clear surface and starting at foot with person
at clew and tack make one foot to two foot folds by bringing the head down toward you gradually
and evenly. Finally fold from clew to tack or vice versa.
Preventive Maintenance
Be sure if you have a tabernacle, the screws and bolts are periodically checked.
Woodwork-
Varnish at least once a year using any good marine varnish. Teak can be either oiled or varnished.
Bottom Paintrecommended in both fresh and salt water. Follow directions on canbe sure to paint
centerboard as well as bottom.
LeakingShould any leaks develop through hardware fastenings, hull and deck joints, etc , these
can be easily fixed by applying a good marine sealant.
Trailer
Normally any good marine boat trailer is sufficient that will support the complete boat's weight plus
say 20 percent which will cover weight of normal gear.
A "trailing package" is a great help as it keeps mast and boom off the boat and makes tying down
easier.
For The Racer
The rake of the mast can be changed by adjusting the headstay turnbuckle and then re-adjusting the
sidestays. In general, a boat will perform better while sailing to windward with some aft rake and
better downwind with the mast plumb or slightly raked forward. Races are usually won to weather,
so favor more aft rake, if anything.
Sail Set the jib halyard should be taken up so that the tension on the luff while under sail, is the
same as on the headstay. The tension on the foot and luff of the mainsail should be such that there
are no stress lines or wrinkles in the sail. Apply more tension as the wind increases, which will move
the draft forward and decrease heeling moment, etc. In general, the outhaul should be slacked while
sailing off the wind in order to create more draft in sail.
Tell Tales are an invaluable aid in determining wind direction 8 inch pieces of yarn tied to sidestays
2 ft to 4 ft up from chainplate and a wind pennant on top of mast.
6 inch to 8 inch pieces of yarn taped to luff of jib on both sides every 3 feet or so on bottom half of
sail 8 inches back from luff wire are excellent wind flow guides. If you point too high, weather yarn
flutters and if pointing too low, leeward yarn flutters. Both should flow back evenly remember this
only tells you flow pattern for a given jib trim, so trim must be correct for sailing angle.
Glossary
AFT: In the neighborhood or direction of the stern.
BATTEN: A thin wooden or plastic strip placed in a pocket in the leech of a sail to help hold its form.
BLOCK: Pulley consisting of a frame in which is set one or more sheaves or rollers Ropes are run
over these rollers.
BOOM: Spar at the foot of the mainsail.
BOOM VANG: The wire pendant attached to one of the boom vang blocks slides into a plate secured
to the bottom of the boom about 3' aft of the gooseneck. The other block attaches to an eye at the
base of the mast. See Fig .10 and main photo. The vangs purpose is to keep the boom steady and
horizontal while sailing.
BOW: The forward part of a boat.
CENTERBOARD: A keel like device that can be hoisted or lowered in a trunk that acts as a keel in
shoal draft boats.
CENTERBOARD PENDANT: Line used to raise and lower centerboard.
CHAINPLATES: Strips of metal fastened to the boat s hull near the deck line to take the stress of
stays.
CLEAT: A fitting to which ropes are made fast.
CLEVIS PIN: A small stainless steel pin that has a hole in one end for a cotter pin and is used to
secure stays to chainplates and mast fittings.
CLEW: The aftermost lower corner of a sail.
COCKPIT: An open area lower than a boat's deck where the occupants sit.
COTTERPIN: A straight or circular split metal pin used to hold a clevis pin in place.
DOWNHAUL: A device used to tighten the luff of a sail.
FAIRLEAD: An eye used to lead line in the direction desired.
FOOT: The lower edge of a sail.
GOOSENECK: A metal device that secures the boom to the mast.
GUDGEON: A metal socket attached to the transom to receive the pintle of the rudder.
GUNWALE: The upper edge of a boat's side, where it meets the deck.
HALYARD: A line for hoisting (or raising) the sails.
HEAD: The upper corner of a sail.
HEADBOARD: The fitting at the head of a sail with a hole in it to receive the main halyard.
HEADSTAY: The foremost stay on a sailboat A jib is set on a headstay.
HULL: Main body of a boat.
JIB: A triangular sail set forward of the mast.
JIB SNAPS: Small fittings that are attached to the luff of a jib which secure the jib to the headstay.
JIBE: The action of the mainsail when shifting from one side of the boat to the other.
LEECH: The after edge of a sail.
LEEWARD: Away from the wind.
LINE: The common expression for a rope in use.
LUFF: The forward edge of a sail.
MAINSAIL: The principal sail on the mainmast.
MAINSHEET: The line used to trim a mainsail.
MAST: An aluminum tube designed to stand on end so as to support a boom plus one or more sails.
MAST STEP: A metal fitting that holds the base of the mast in position.
OUTHAUL: A line used to haul the clew of a sail out to the end of the boom.
PINTLES: Pins on the forward side of a boat's rudder designed to rest in and pivot on the gudgeons
secured to the transom.
PORT: The left side of a vessel facing forward.
REEFING: To reduce a sail by rolling or folding up part of it.
RIGGING: The wire supporting the spars is called standing rigging (stays or shrouds) and the ropes
used in setting and trimming sails are known as running rigging (halyards and sheets).
RUDDER: A vertical plate attached to the stern of a boat used in steering it.
SELF RESCUING: A feature which enables the crew to right and sail away a boat which has
capsized.
SHACKLE: A U shaped piece of metal with a pin across the open ends.
SHEET: A rope used to trim a sail.
SHROUD: Same as a stay.
SLACK: The opposite of taut. Slack away or off to pay out.
SLOOP: A one masted vessel with two or more sails.
SPAR: A mast, a boom, etc.
SPREADERS: Aluminum tubes that project from a mast in a traverse direction in order to keep a stay
at proper tension and to help hold the mast erect.
STARBOARD: The right side of a boat, facing forward.
STAY: A length of wire used to support a spar.
STEMHEAD FITTING: The fitting nearest the bow on the deck where the headstay attaches. STEP
To step a mast is to set it in position.
STERN: The after part of a boat.
TABERNACLE: A fitting designed so that the mast can be lowered when passing under obstructions,
also facilitates stepping and unstepping the mast.
TACK: The lower forward corner of a sail.
TILLER: A piece of wood connected with the rudder head. By this the rudder is moved as desired.
TOPPING LIFT: A rope that attaches to the top of the mast and fastens to the end of the boom. Its
purpose is to hold the end of the boom up when the mainsail is lowered.
TRIM: To trim sails. To put them in correct relation to the wind by means of sheets.
TRUNK: A centerboard housing.
TURNBUCKLE: A device used to maintain correct tension on rigging.
WINDWARD: Toward the wind.
Forum posts and photos are copyrighted by their respective authors. Everything else copyright © 2015 by the Day Sailer Association. Contact webmaster.