Page 1 of 2
Replacing Chainplates

Posted:
Sun May 25, 2014 11:55 pmby DavidF
Last fall, I had the bolts on one of my chainplates fail, and that led to a mast hinge failure and a neutrally buoyant DSII. It took that as an opportunity to upgrade my stays, and because of the larger clevis pins, I replaced the chainplates too. I think that the chainplate that failed was original, and one contributing factor may have been stays that were not adequately tensioned, which led to some significant loads while on mooring.
Today, as I was removing the other chainplate, one of the bolts snapped too. If you are upgrading your rigging, or looking for cheap maintenance, I would highly recommend replacing/upgrading your chainplates. I ordered new chainplates from D&R, and had them include new bolts too. The new bolts are beefier, and the stay attachment holes are drilled to match the diameter of the thicker clevis pins on the upgraded stays.
Definitely a cheap upgrade that reinforces a potential failure point.
Re: Replacing Chainplates
Posted:
Mon May 26, 2014 1:07 amby GreenLake
How are the chainplates fixed to the hull? I thought on the DSII they were "hooked" under the lip formed by the hull-deck joint?
Re: Replacing Chainplates
Posted:
Mon May 26, 2014 10:35 amby Alan
They're through-bolted to the lip, with a small reinforcing plate underneath.
Re: Replacing Chainplates
Posted:
Mon May 26, 2014 5:00 pmby GreenLake
With bolts on tension? On my DS1 they are inverted T shaped with the middle sticking through a slot in the deck an the base bolted into the side of the hull. Bolts on shear, and deck laminate would have to rip as well to let them fail. SS in salt water is prone to crevice corrosion, that would make that design something that you'd need to inspect frequently.
Re: Replacing Chainplates
Posted:
Mon May 26, 2014 9:03 pmby Alan
Not only are they on tension, they're small - No. 8 screws, if memory serves. The screws are secured by self-locking nuts. I replaced mine with heavier material, and four No. 10 screws instead of two No. 8s.
The DS1 setup sounds a lot less prone to breakage.
Re: Replacing Chainplates
Posted:
Tue May 27, 2014 12:07 amby GreenLake
Why don't you post a picture or a diagram showing the specs for your upgrade?
Re: Replacing Chainplates
Posted:
Tue May 27, 2014 12:24 amby Alan
OK. I should have photos and a source for the materials late tomorrow.
Re: Replacing Chainplates
Posted:
Wed May 28, 2014 6:18 pmby Alan
Here are the photos of one of the heavy-duty chainplates I concocted (port side shown). I'm in the process of lengthening my too-short mast, which means I need extensions from the lower ends of the shrouds to the chainplates. I'm using links from my anchor chain, 1/4-inch stainless. I haven't cut the chain yet because for some reason, I need four links on the port side and five links on the starboard side, even though the mast looks vertical when viewed from the stern.
The extended mast is the result of a lengthened stub, which I installed because the forestay and shrouds were sloppy loose even with the turnbuckles shortened all the way. The lengthening places the lower edges of the spreader brackets at exactly 7 feet 8 inches from the top of the cuddy (the class specification). Why I need extensions if the spreader bracket height is correct is a mystery, but they work, so what the heck?
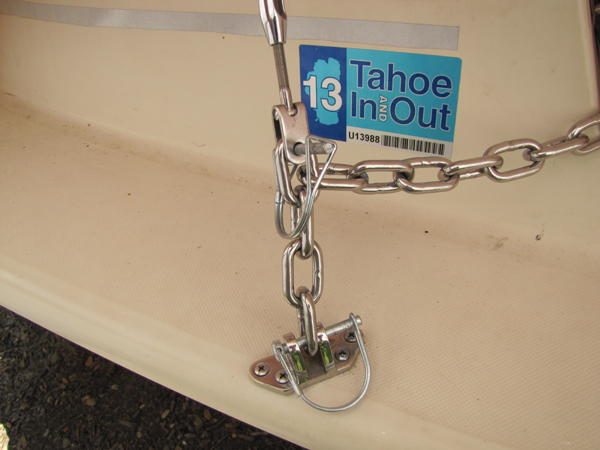
- Port chainplate.jpg (191.84 KiB) Viewed 29372 times
The chainplate is actually half of a hinge. It uses four No. 10 screws with self-locking nuts.

- Chainplate reinforcement - inner.jpg (217.35 KiB) Viewed 29372 times
Two of the screws end up inside the cuddy. They're reinforced with 1/4-inch ABS.

- Chainplate reinforcerment - outer.jpg (144.76 KiB) Viewed 29372 times
The outer two screws pass through the hull-deck joint lip. The reinforcing plate is made of 1/2-inch plastic half-round rod that I got from TAP Plastics, with a split section of 1/2-inch PVC pipe around it to enlarge the diameter so it fits exactly inside the lip. The Schedule 40 pipe I used is a bit too thick, so I need to replace it with the thinner stuff (Schedule 125, I think).
Re: Replacing Chainplates
Posted:
Thu May 29, 2014 1:59 amby GreenLake
Lots of interesting detail that I would not have guessed without the pictures.
About the mast being vertical - hang a weight from a halyard (when the boat is level) and you will see. Or better yet, take the same halyard from one chain-plate to another - should be the same distance.
Re: Replacing Chainplates
Posted:
Sun Jun 01, 2014 11:37 pmby Skippa
Two years ago I had a chainplate bolt fail, I took the opportunity to upgrade the rigging. After reading a few posts on the subject I purchased a couple feet of 1 inch stainless steel tube, Had a local machine shop cut it in half horizontally so I had a couple of "half tubes". These served as the new backing plates under the coaming for the new larger chainplates.
Because the new side stays had larger clevis pins that were too large for the original chainplates, I purchased two new headstay chainplates from D&R. These are now mounted on each side replacing the smaller original chainplates port and starboard.
So now my side stays are the larger diameter wire, Larger "headstay" chainplates with about 6 inches of thick wall SS half tube underneath as backing plates. All held together with #10 SS bolts,
The bolt failure has also caused me to inspect the rigging more frequently.
Good luck with your upgrade.
Kevin
Re: Replacing Chainplates
Posted:
Mon Jun 02, 2014 4:03 pmby gunnerasch
Im almost finished with the hardware portion of a stripped DS2 I picked up a couple months ago. Being cheap (and largely broke) I made my own chainplates out of non stainless steel and put 4" of solid 316 stainless steel bar stock under each one.
https://picasaweb.google.com/1040422822 ... 4313719634https://picasaweb.google.com/1040422822 ... 8958864162https://picasaweb.google.com/1040422822 ... 2602/Oday#
Re: Replacing Chainplates
Posted:
Tue Jun 03, 2014 11:24 amby DavidF
Skippa,
I just purchased upgraded rigging from D&R and at the same time ordered new chainplates. I was expecting to have to enlarge the holes in the chainplates, but the ones that I received were drilled out to fit the new, bigger clevis pins.
David.
Re: Replacing Chainplates
Posted:
Sat Jun 28, 2014 1:33 pmby TIM WEBB
When I installled the upgraded stays/turnbuckles, they came with 1/4" pins in the forks, that were too large for the old chainplate holes, so I put small shackles between them. Didn't fail, but weak link. For a little more peace of mind, I got the new CP's w/ the 1/4" holes, two 3" x 1" OD x 0.76" ID SS tubes, custom cut for about $5/ea here:
http://www.onlinemetals.com/merchant.cf ... &top_cat=0and used 3" 1/4-20 SS bolts with nyloc nuts. Will keep an eye on them for awhile to see if the nuts loosen - may have to put on lock washers?

Re: Replacing Chainplates
Posted:
Sat Jun 28, 2014 1:42 pmby Skippa
Tim,
My solution is almost the same as yours with one exception. I laid the "half tube" in the half round of the gunwale. It appears yours is inverted relative to the gunwale. The only issue I have was as I tightened the nuts, the washers bent to conform to the radius of the tube. After sailing with this set up for over a year, I have noticed no looseness of the nuts.
Re: Replacing Chainplates
Posted:
Sat Jun 28, 2014 2:46 pmby TIM WEBB
I just used the full round tubes - didn't really see any need to cut them lengthwise? In fact, the old backing plates were such that the same effect you noticed, the nuts/washers being up against the concave, was happening, and they had even been installed "backwards", i.e. with the rounded side of the nuts up against the plates. This way I figured I could tighten 'em up right against the tube, same as if I decide to add washers and/or lock washers later. However, it *was* a bit tricky drilling the holes so they were aligned properly ...